Make a movie using Adobe After Effects
Use the original media content (drawings, photos of physical models, 2D/3D models, audio etc)
you created for AS91610 to make a movie for AS91903 using Adobe After Effects
you created for AS91610 to make a movie for AS91903 using Adobe After Effects
INSTRUCTIONS
1. Is Adobe After Effects installed on your computer? If its not, search Adobe Creative Cloud & install it.
2. Review all the the information on this page & watch the suggested YouTube After tutorial videos before starting your movie.
3. Plan your movie by doing a storyboard. What story or information are your telling about your project?
4. Create all the 'original media content' of your concept design project - drawings, screenshots, 3D digital models audio etc.
Don't use other peoples copyrighted content, unless it is Creative Commons content that you reference in end credits.
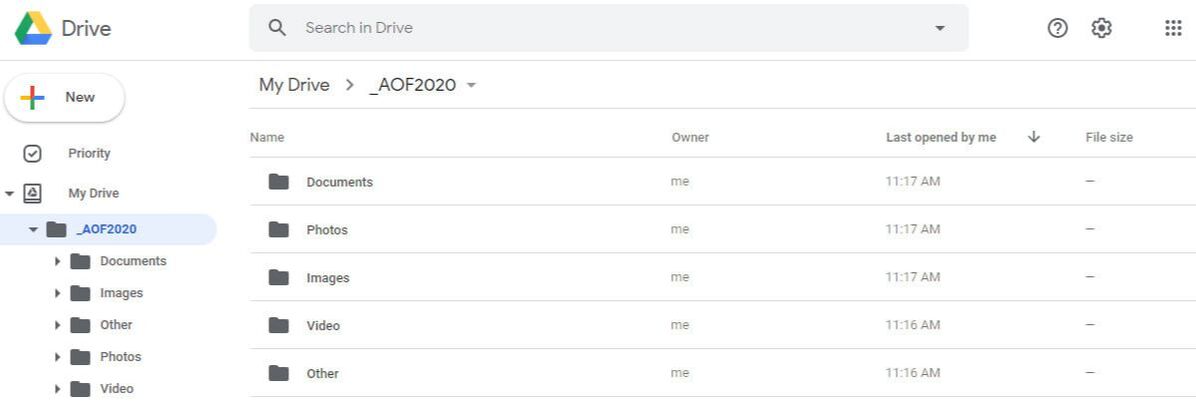
5. Name & save all original digital media content using good folder/file management system before you start making your movie. This image is an example of folder management, save your media content in the correct folders. This image shows folder management on a Google Drive, but for After Effects you need to save your media on your computer in My Documents. Make sure all your media is correctly named before adding it into After Effects. More info about this on digital.school.nz/project
6. There are several stages to making your movie; (1) movie composition settings, (2) animating text with key frames, (3) adding media content assets, (4) visual effects, (5) rendering your movie. This page gives you information for all 5 stages.
7. The composition of your our movie should include...
20 seconds of opening credits animated text at the start of your movie should include your name, student #, AS91903, name of your project, date, an image of your project. First impressions count, how inspirational is the first 20 seconds of your movie?
Images should be on screen for at least 10 seconds & be high resolution.
Photos of drawings should be high resolution with no shadows.
Screenshot images should be high quality & cropped to show relevant info.
Fly thru animations of 3D models should be no more than 1 minute long.
Original audio if you want to include background music in your movie. Don't rip YouTube music, make your own music.
Narration description if you want to talk over your movie to describe what's on screen, use your phone to record yourself speaking about your project. Download the audio files & add them into your After Effects composition. Make sure what your talking about relates to what's on screen.
AI narration. To shy & don't want to hear yourself speak on your video? Write your movie narrative text & use AI voice narration software to speak for you (might require paid subscriptions). Try Natural Readers or TSSMP3 or Lovo or other AI audio apps.
Download the AI text to speak files & add them into your After Effects composition.
End credits. Add text at the end of your movie if you want to include shout-outs, need to reference images you have used from the Internet or other content you don't own that you have used in your movie.
(1)
MOVIE COMPOSITION SETTINGS
MOVIE COMPOSITION SETTINGS
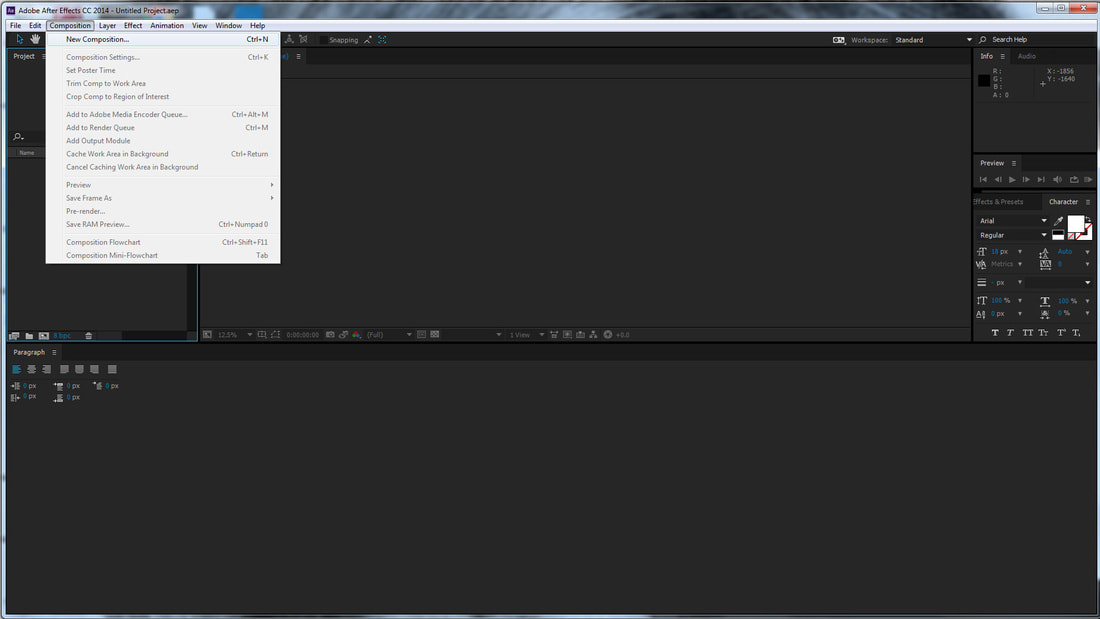
Open After Effects & start a new movie composition
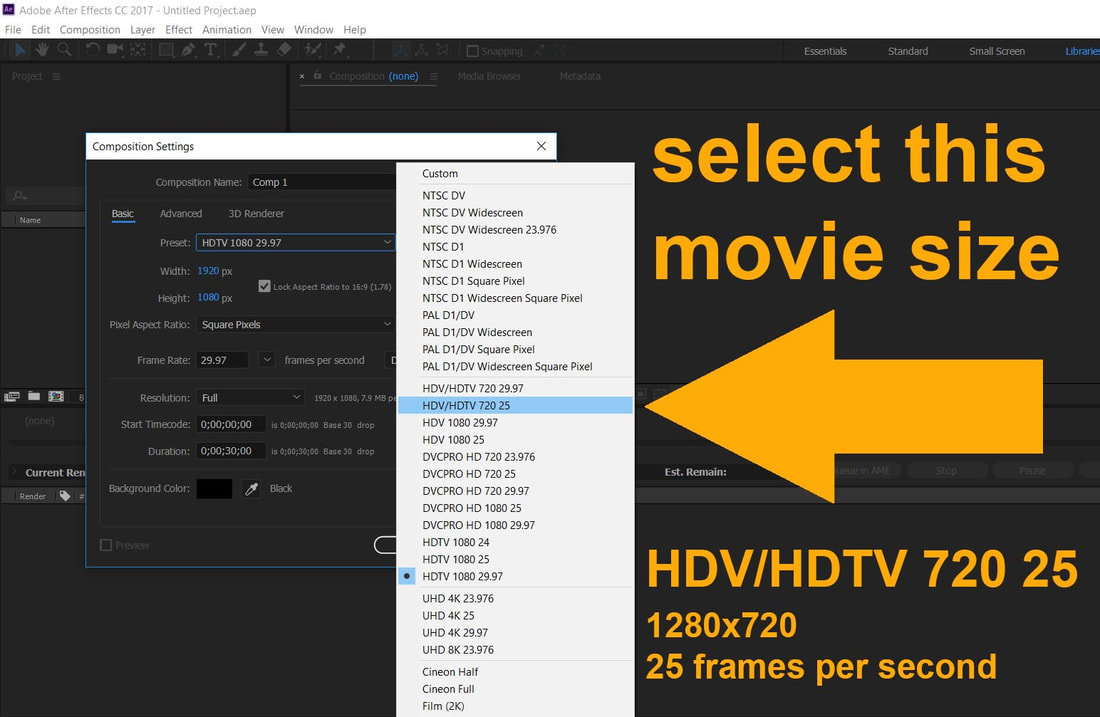
Select HDV/HDTV 720 25. The movie size will be 1280x720. If you select a higher movie size like 4K your computer wont be able to cope with the size of the file & crash. 25 refers to the number of frames per second, in New Zealand the standard is 25 FPS, other countries use different frame rates.
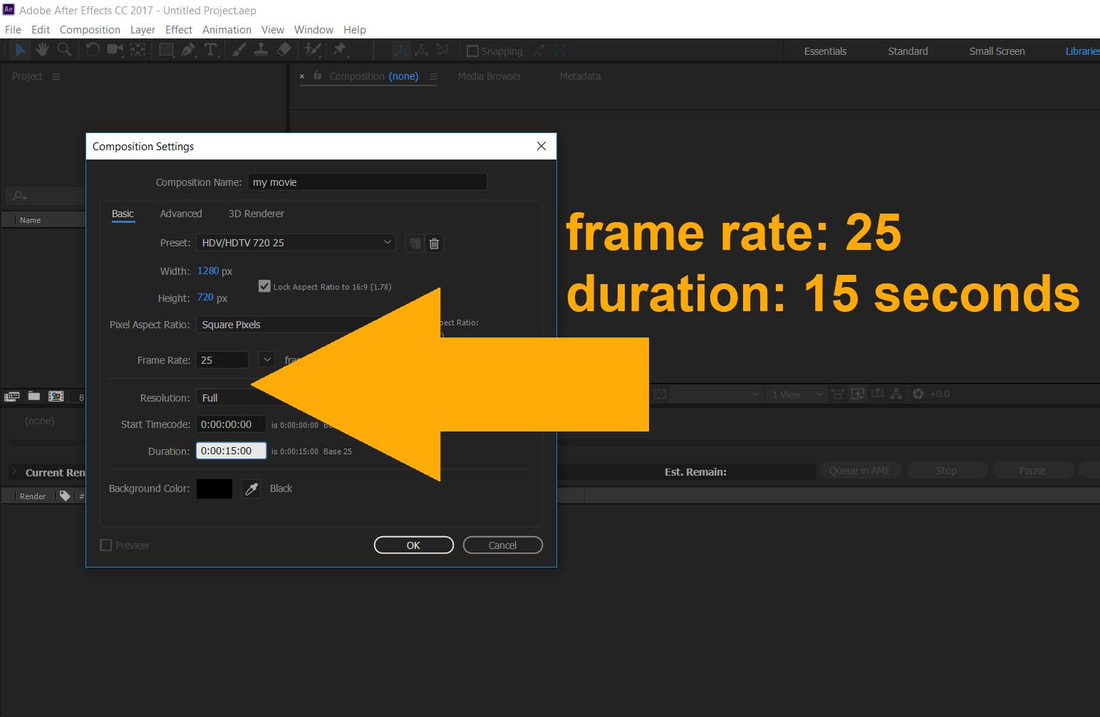
Set the frame rate to 25. Set the movie duration to 15 seconds just to practice animating using key frames. You can change the length of the movie later. (Hotkey CTRL K to open the composition settings box to change the movie length). Name your movie in the composition name panel. Click OK start.
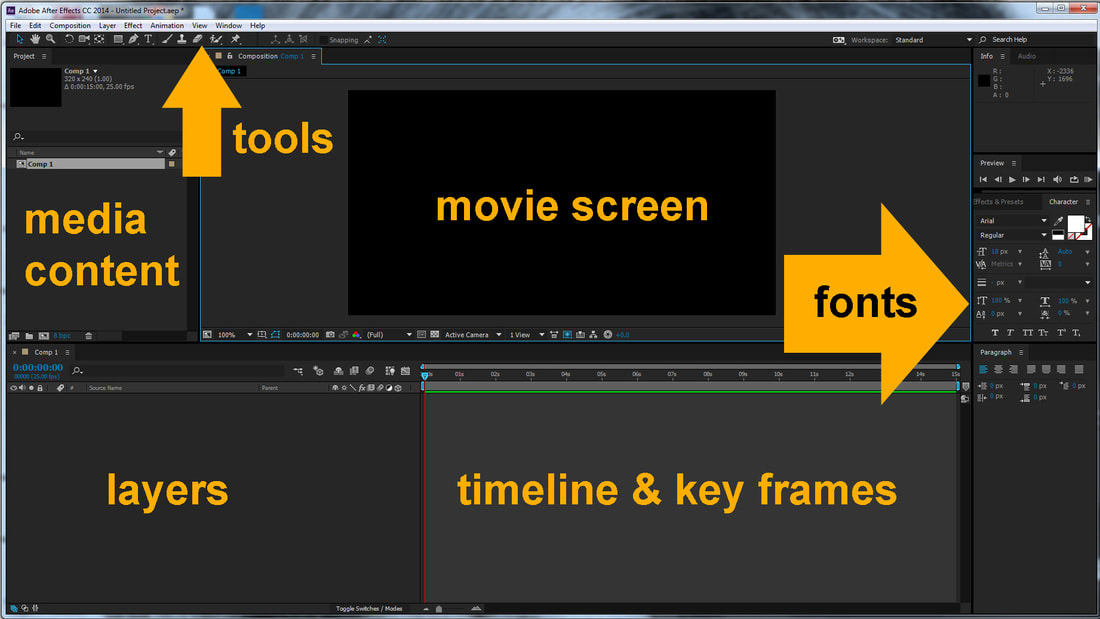
These are the main areas of After Effects. See (4) below to import your digital media content files into the 'media content' box.
Name your content files properly with good descriptions, when when you drag your media content into the layers box its easier to understand what content your working with especially if you have heaps of layers, this is good industry standard practice.
Name your content files properly with good descriptions, when when you drag your media content into the layers box its easier to understand what content your working with especially if you have heaps of layers, this is good industry standard practice.
(2)
ANIMATING TEXT WITH KEY FRAMES
ANIMATING TEXT WITH KEY FRAMES
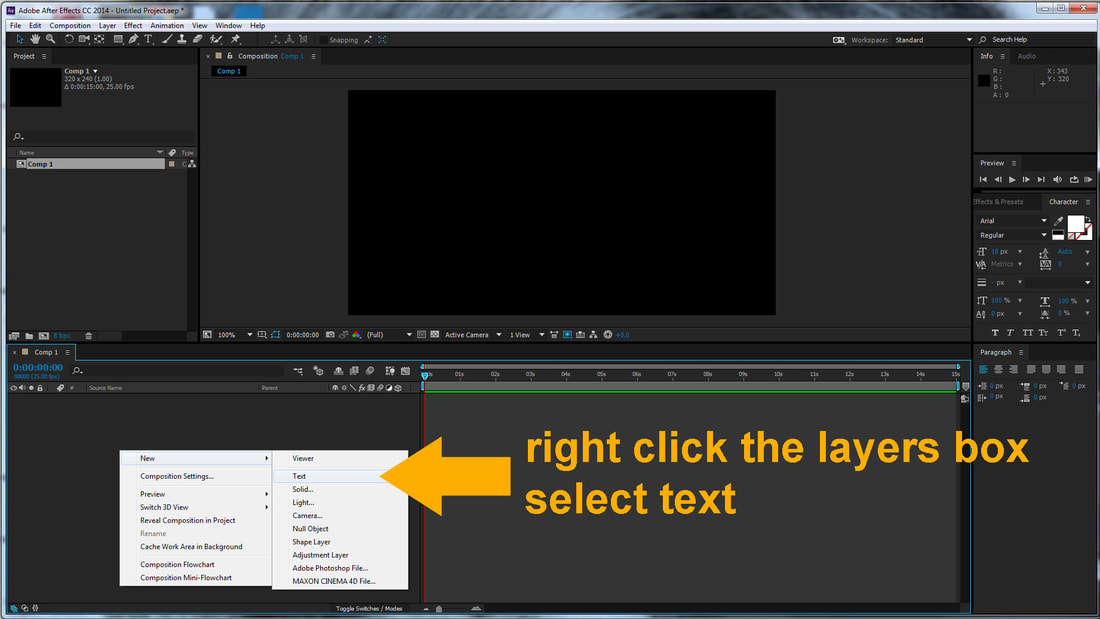
Animating text with key frames. Right click the layers box, or the movie screen or timeline boxes to get a pop up. Select text.
You can use the same process of animating text as selecting solid... (under text) or importing any other image into the media content box. The process of animation using key frames is the same regardless of text, solid or image.
You can use the same process of animating text as selecting solid... (under text) or importing any other image into the media content box. The process of animation using key frames is the same regardless of text, solid or image.
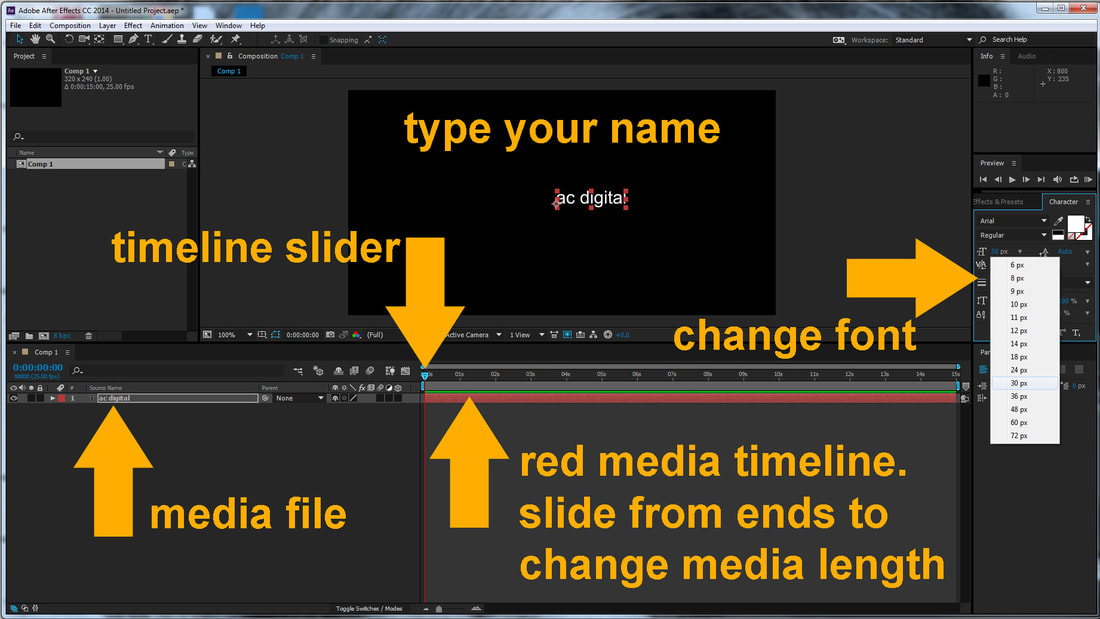
Type your name or any other text you want. You can change the font & colour in the right side panel. When you add text it adds a layer called a media file, the bar is red. It automatically sets to the length of your movie (15 seconds in this case). One way of changing the length of the text media file by dragging the red bar from either end & move it within the timeline.
Click the small arrow head next to the red square of the media file. Then click transform. This will give you the options of anchor point, position, scale, rotation, opacity. You will use these all the time for key framing animations of your text, shape or image.
With the time slider at 0 seconds, click the stopwatch next to position. This will set a keyframe which looks like a diamond. The keyframe diamond keeps the animation data, which is the X+Y position of the text, shape or image & the time, 0 seconds in this case.
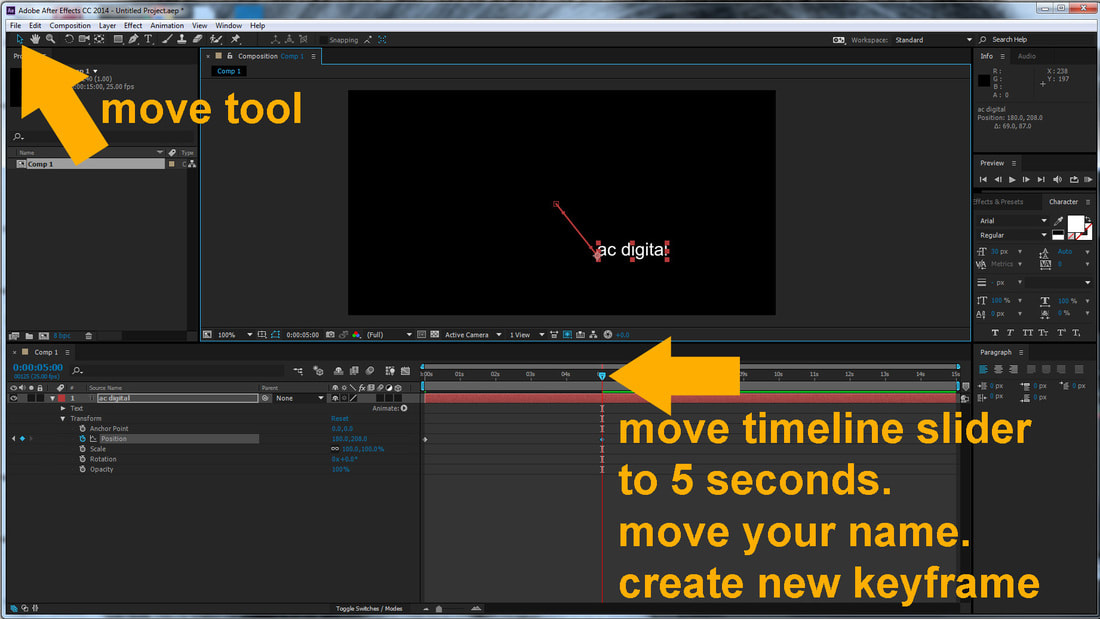
Move the time slider to 5 seconds. Move your text to somewhere else on the screen. After Effects will automatically create a key frame. The red line you see on the image below is called a 'tracking curve line' between key frames. Take the time slider back to 0 seconds & press the space bar on your keyboard. Your text should move until 5 seconds then stop & the time slider will continue until 15 seconds.
Take your time slider back to 10 seconds. Move your text to somewhere else on the screen. This will automatically create another keyframe. Move the time slider to 15 seconds. Move your text to somewhere else on the screen. This will automatically create another key frame at 15 seconds. Take your time slider back to 0. Press the space bar on your keyboard. Your text should move around the screen for 15 seconds. Use the same process to animate solids or images.
This YouTube video tutorial shows you how to animate text as described above
This YouTube video tutorial shows you more examples of how to animate text using keyframes
This YouTube video tutorial shows you examples of how to animate images using keyframes
(3)
ADDING MEDIA CONTENT ASSETS
ADDING MEDIA CONTENT ASSETS
Adding media content to your composition. Make sure your digital media content files are in folders before you start.
Watch this YouTube video to see the different ways to add media content into your movie compilation.
Watch this YouTube video to see the different ways to add media content into your movie compilation.
(4)
VISUAL EFFECTS
VISUAL EFFECTS
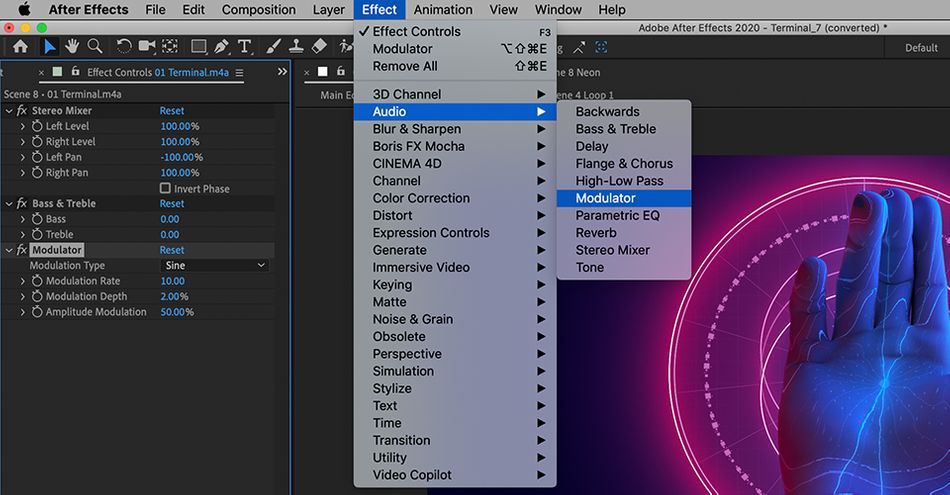
There are HEAPS of standard effects in After Effects. Select a media in the layers box then click the Effect tab. The effect will open in the Effect Control tab & you can change the parameters of the effect on the media. If you have never used an effect before, open YouTube & search the effect, eg: 'audio modulator after effect tutorial'. Practice the effect based on the tutorials.
There are loads of cool of YouTube After Effects tutorials, take the time to watch & practice them for your movie.
eg: watch this 'speed ramp' tutorial from 0:40 to 4:39 or 'lyrics behind the artist' tutorial from 4:40 to 11:53
eg: watch this 'speed ramp' tutorial from 0:40 to 4:39 or 'lyrics behind the artist' tutorial from 4:40 to 11:53
Animating shapes motion graphics visual effects YouTube tutorial
I think vector lines are super cool! Try this 3 second vector line visual effect tutorial
Want more visual effects tutorials...
watch these 1 minute tutorials for luminous outlines, prism lens, space aliens, write on, kaleidoscopic & snow effects
(5)
RENDERING YOUR MOVIE
RENDERING YOUR MOVIE
Once you have finished the composition of your movie, its time to render it. Rendering means taking all your content & layers & animations & visual effects in your composition and turning it all into 1 movie file.
Watch this tutorial to use Adobe Media Encoder to render your movie.
Name your first movie test render #1.
Once you have rendered your video, watch it to look for any errors or things you could improve on.
Go back into After Effects and edit your composition & re-render your movie with sequential file naming #2, #3 etc.
Repeat the process to test the quality etc of your movie until your movie is legit.
digital.school.nz by Marc Williams ©2023 email
